11 Dec What Does Red Light on Mobo Mean
Cracking open your computer case to peek inside is almost like gazing into the workings of a mechanical heart. The steady blink of red light on mobo scattered across the motherboard is akin to a pulse, indicating components functioning as intended. But when one turns ominous blood red instead of a healthy green or blue, it seems to beat out of rhythm compared to the rest. I’m sure some of you have felt a clench in your chest upon noticing it. That glowing crimson eye stares back menacingly, almost like it’s warning you.
I know the shock of seeing an angry red LED lit up inside your computer can cause panic. It’s important first to take a deep breath and relax! That alarming glow may seem deadly serious, but it could signify only a minor issue. Let’s dive deeper into why motherboards have status lights in the first place and decode what red ones mean, from benign warnings to more critical alarms.
Why Do Motherboards Have Lights?
Motherboards contain a central nervous system of sorts, acting as a home base for all other components in a computer, like the CPU, memory, storage, and more. Printed circuit boards house conductive pathways carrying data signals throughout this command center. They also provide power regulation, controlling voltage flow from the power supply to components without surging or harming delicate electronics.
Integrated on most motherboards are arrays of light-emitting diodes (LEDs). These tiny status indicators serve as visual communication points, illuminating areas of concern. It’s similar to warning lights conveniently built into the dashboard of your car. Before the “check engine” indicator meant taking your vehicle to the shop to plug into a code reader, motherboards evolved their own primitive version to call attention to potential issues.
Let’s examine why red LEDs trigger our alarm bells when spying them inside our computers.
Glowing Red Light on MoBo: Stop or Caution?
That foreboding crimson glare staring back from the motherboard seems to shout, “DANGER!” Red conjures urgency in our minds thanks to associations like stop signs, fire engines, emergency exit signage, and more. When visible on PCBs, pulsing red LEDs certainly shoot adrenaline into tech enthusiasts. But are they foretelling catastrophic failure?
Not necessarily! Motherboard status light communication issues vary between manufacturers. But many code red LEDs to signify either harmless warnings or moderately serious conditions needing attention. Interpreting the difference means first recognizing WHERE on your board the glow emanates from.
Locating the Source
Motherboard LED locations fall into two categories: power or component-specific. Let’s examine both so you can pinpoint the origin of any scarlet beacon tattling problems.
Power Lights
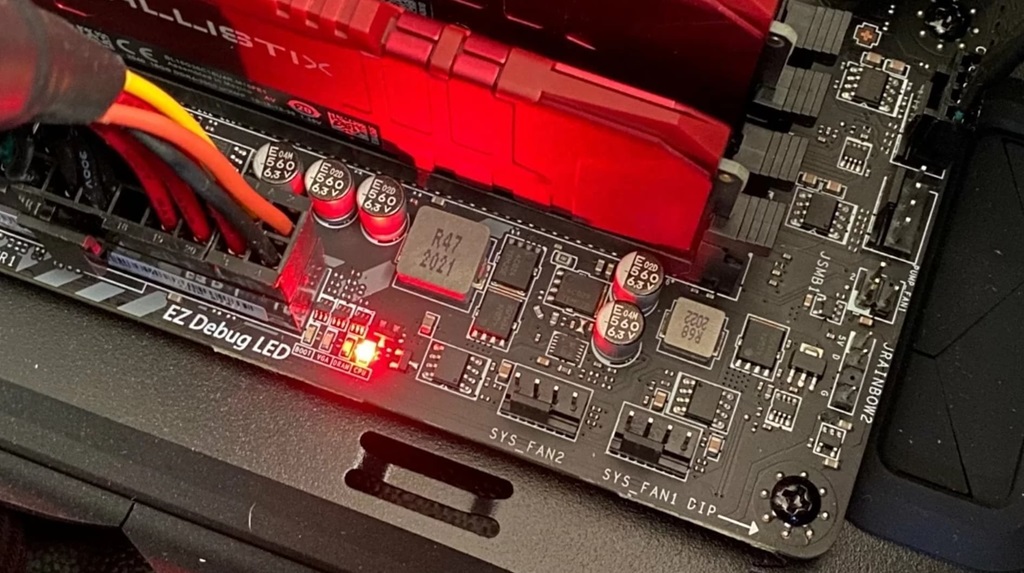
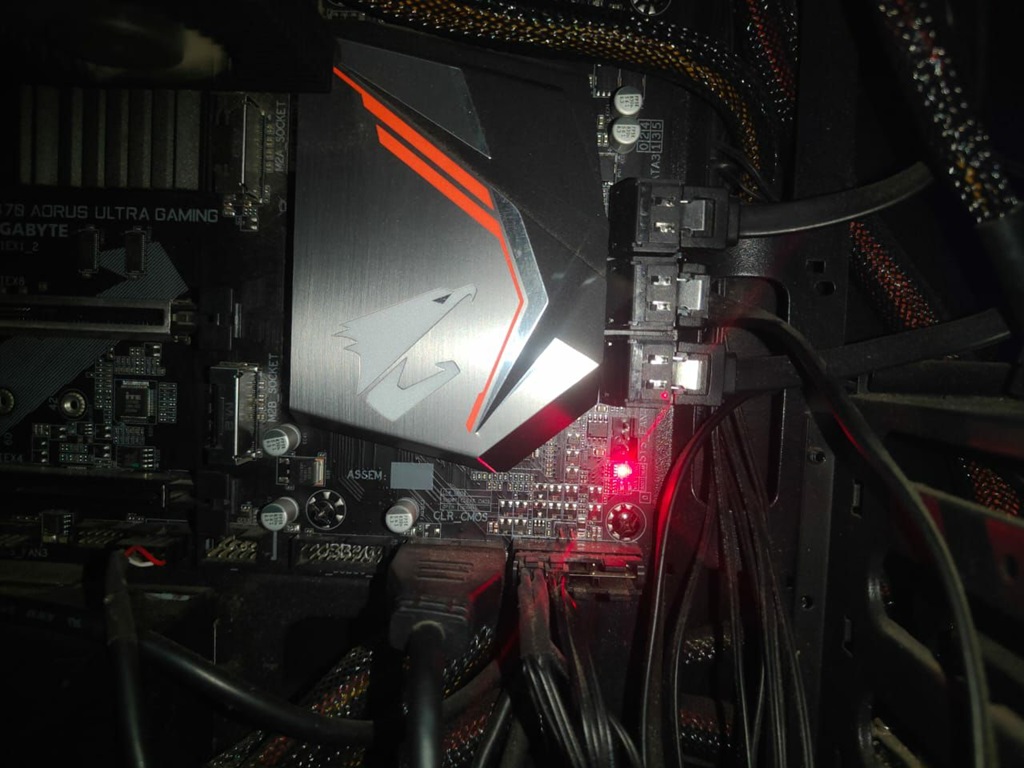
Boards contain several power regulation phases keeping optimal juice flowing to components without risk of overheating or short-circuiting. An LED indicator next to capacitors, chokes, MOSFETs, or other voltage gear signals issues delivering clean stable power when glowing red. These areas sometimes label trouble spots like “VCORE” for CPU core voltage, “VDIMM” indicating RAM issues, or “VGA” around video card slots.
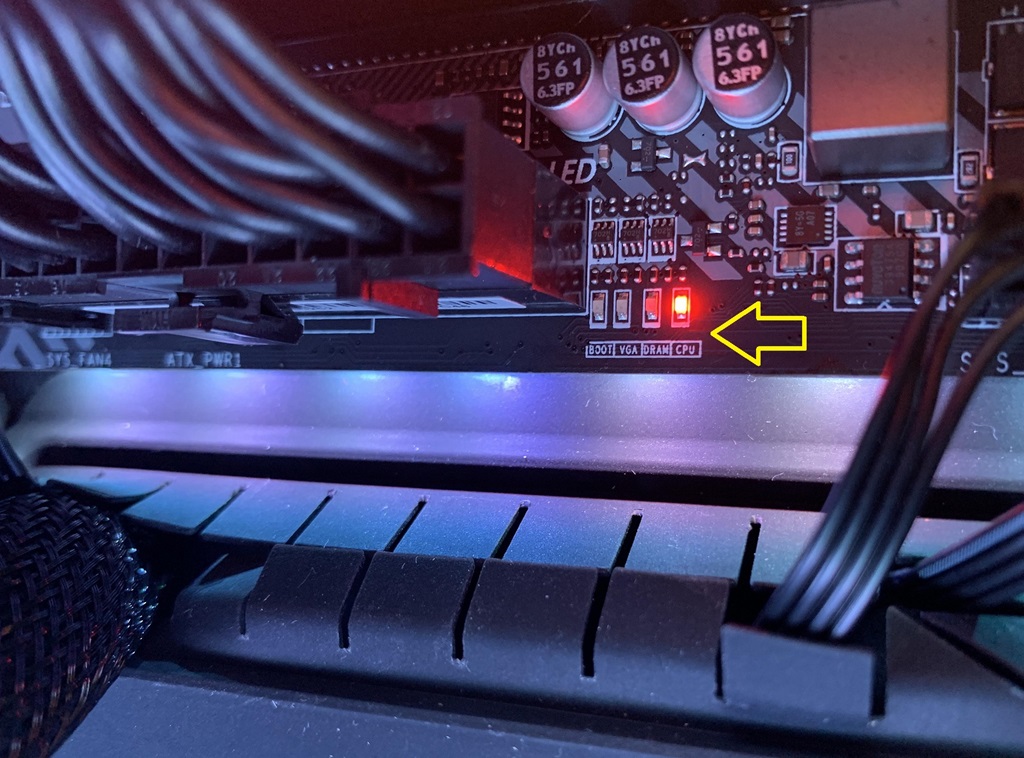
Component Lights
LEDs also highlight specific integrated parts like the central processing unit (CPU), memory slots (DIMM or DRAM), video connector (VGA), ethernet port, and/or boot status. Red or amber means looming issues in those locations, like CPU overheating, RAM failure, no display signal, invalid boot device, etc. Your motherboard manual should include a layout diagram with debug LED labeling to precisely identify problem sources.
So while any red light rightfully raises eyebrows, recognizing their specific position helps narrow causes before you panic!
Common Culprits Behind Red Glowing LEDs
Now that we know where to look on motherboards to pinpoint red status LED signaling issues let’s spotlight some typical offenders, making them angrily blush red light on mobo:
Power Problems
Since boards regulate the voltage to all other computer components, hiccups supplying steady, clean power trigger red alert lights around voltage circuitry, and power faults stem from either the PSU (power supply unit), VRM (voltage regulator module on board), or faulty electrical connections.
Possible causes include:
- Failing or inadequate PSU unable to deliver sufficient wattage
- Dust/debris fouling VRM heatsinks causing thermal throttling
- Power connectors not fully seated into the motherboard
- Damaged capacitors, VRMs, or chokes
- Bent or broken pins in CPU socket or PCIe slots
So, upon seeing any angry red power LEDs, inspect all PSU cables and ports to ensure tight, secure connections. Also, peer closely at the board itself, checking for obstructions in VRM heatsinks or signs of damaged components.
Overheating Parts
Processors, GPUs, chipsets, and other integrated silicon generate substantial heat needing dissipation. Insufficient cooling causes temperatures to escalate to dangerous levels, triggering red status LEDs around CPU sockets or other zones.
Typical overheating causes:
- CPU or graphics card fans/heatsinks blocked by dust/wires
- Dried-up, inefficient thermal paste between chips and coolers
- Failing fans unable to spin up to duty speeds adequately
- Case/component fans grinding to a halt altogether
- Poor case ventilation if intakes are blocked or hot air exhaust is cut off
Carefully clean all fans and heatsink surfaces if you see alarming red temperature indicators. Also, inspect CPU coolers to ensure they are still securely fastened to boards. Replacing worn thermal paste between processors and heat spreaders assists in cooling too. And guarantee sufficient airflow moving through the case.
Memory Issues
While the previous red alerts stem from power or thermal hurdles, glowing LEDs around DIMM slots indicate memory woes. Whether modules are partially seated or completely failed, angry red memory channel lights reflect RAM experiencing problems.
Common DIMM dilemmas shown by red indicators next to slots involve:
- Improperly inserted memory not fully clicked into place
- Incompatible RAM speed, timing, or voltage outside board specs
- Accumulation of dust/debris on gold contacts
- Defective DIMM with damaged components inside
- Failed memory controller or board wiring routes
Reseating DIMMs often resolves any connection issues. You can test modules individually in each slot to isolate failures pinpointing bad sticks. Also, try swapping in spare RAM known to work properly to help diagnose whether modules or motherboards’ own controllers cause errors.
Boot Failure
Nearly all motherboards house a rectangular 8-pin chip labeled BIOS near RAM slots managing initial boot-up duties. Red glow from this firmware chip or nearby LED signifies failure passing hardware initialization power-on self-tests (POST).
Common boot fail triggers:
- Corrupted BIOS settings needing CMOS resetting
- Disconnected storage drives with OS installed
- Faulty storage drives not allowing bootup initiation
- Attempting to boot from empty optical disc drives
Reconnect or replace broken storage devices showing in BIOS that may cause red boot LEDs. And loading BIOS-optimized defaults or updating firmware revisions may alleviate POST issues if able to enter settings.
Should You Worry About Red Glowing LEDs?
Like staring at an oil pressure warning glaring red on your car dashboard, seeing an angry crimson LED ignited inside your computer undoubtedly quickens the pulse.
But before spiraling into full panic, realize many illumination variations signal non-critical notifications versus catastrophic meltdowns. Review your particular motherboard’s manual for clarification on severity levels its debug LEDs indicate.
Blinking patterns prove important, too, for gauging urgency. For example, boards may code:
- Solid red light = minor issue
- Flashing slowly = moderate concern
- Rapid blinking = critical warning
So avoid automatically assuming the worst. Evaluate leak detection red light on mobo rationally to determine true implications. Let’s break down appropriate reactions.
Non-Critical Illumination
Nuisance readings around power or thermals may glow red temporarily without necessarily shutting computers down. Things like:
- Brief voltage dips when components briefly spike
- Quick fan stoppages before automatically restarting
- Momentary power connections jostled loose before reseating
These may safely be ignored if systems recover stability without crashing. However, repeatedly seeing the same warnings might necessitate eventually replacing aging hardware.
Moderate Warnings
Indicators around temperature, memory, or storage often signify areas needing proactive attention before deterioration permits further usage. For example:
- High CPU temperatures near danger zones
- Increasing bad sectors on HDDs bearing failure
- Progressively, more RAM errors indicate imminent demise
Evaluate repair or replacement options when encountering repeating alerts suggesting components are degrading. Otherwise, failure looms!
Critical Alarms
Solid red lights coupled with computers failing to boot or randomly powering down require immediately powering off to prevent permanent damage. For instance:
- RAM slots light up red indicating no memory detected
- Smoke or burning smells from overheated components
- Continuously rebooting prevents operating system loading
Seeing red LEDs paired with corresponding failed functionality or physical signs of flaming components means systems reached critical thresholds. Turn off computers immediately and thoroughly inspect for root causes before resuming operation.
So remain calm, but attentive when evaluating red glowing indicators. Note patterns and pair readings with actual functionality loss before declaring emergency states.
Fixing Issues Highlighted by Red LEDs
Okay, so motherboard debug LEDs prominently glowing red demand attention. How do you go about resolving what ails them? Start with the obvious:
Read Your Motherboard Manual!
Manufacturer documentation includes layout diagrams of board components paired with functions of all integrated LED indicators. Product manuals also outline steps for testing and troubleshooting areas commonly signaling errors via red lights. Follow their advice first for diagnosing locations highlighted as faulty.
Inspect Offending Areas
Visually scrutinize motherboard zones lit up scarlet indicating trouble. Search for loose wires or damaged hardware possibly causing symptoms. Especially look for safety hazards like scorched electronics or melted plastic. Damage visible externally frequently correlates with dead components inside no longer working.
Reseat Connections
Open latches securing RAM modules and cables linking storage drives to carefully disconnect then firmly reattach everything. Slide out expansion cards from PCIe slots scrubbing their gold contacts then push back into motherboard ports cleanly. Bad connections often show up as red status lights so this simple step remedies many early warnings.
Update Drivers/BIOS
Since motherboard firmware and software drivers orchestrate under-the-hood components communicating smoothly, installing their newest revisions often corrects compatibility issues known to trigger red indicators. Updating these fixes bugs potentially illuminating LEDs.
Test Parts Individually
Isolating individual components helps pinpoint whether issues stem from dying parts or instead glitchy motherboards failing to recognize good hardware. Exchange RAM modules between slots to see if problems follow sticks or stay put signaling conductor failure. Also disconnect all non-essential devices basically reducing systems down to just motherboards, single memory module, CPU, and video to check if bare minimums boot up fine. This simplification aids in identifying faulty parts versus software misconfigurations.
Replace Defective Hardware
If all the above steps still leave the same red glowing LEDs lit, chances are components marked as failing indeed suffer from physical deterioration beyond software tweaks resurrecting. Swap in 100% known-good parts like PSUs, memory, CPUs or storage one at a time to isolate precisely which replacement eliminates ominous motherboard red lights at last.
Last Words
While seeing red LEDs ignited on computer motherboards undoubtedly quickens heart rates, don’t panic just yet. All boards integrate arrays of indicator lights communicatively exposing issues. Glowing crimson signifies alerts corresponding to documented diagnostics varying between manufacturers. Note the exact locations of red LEDs whether around power circuitry, component slots like CPU or RAM, boot failure chips, or other zones. Dig into manuals for decoding severity levels from harmless warnings to dangerous meltdowns based on blink speed. Inspect highlighted areas physically for damage while also reseating wires and expansion cards firmly. If a red light on the mobo persists, methodically swap individual parts to pinpoint whether faulty components or software incompatibilities show up as glaring red LEDs. And ultimately replace aging hardware still lighting up problems after exhausting all troubleshooting!
Frequently Asked Questions
Q: Why did my computer suddenly have a red glowing LED on the motherboard when working fine previously?
A: A spontaneously illuminated red LED often coincides with partial hardware failure creeping up over time until finally triggering detectable issues. Common culprits include increased heat levels from clogged heatsinks now throttling temperatures past thresholds, accumulated dust fouling fan motors seizing movement, deteriorated PSU capacitors struggling to smooth voltage ripples, or memory chips beginning to flake out corrupted data until modules completely die off.
Q: How can I tell whether a red motherboard LED indicates a serious or moderate issue?
A: Check your board’s manual for severity distinctions between solid versus blinking red LED modes. Constant illumination often signals minor warnings not halting functionality which may be safely ignored temporarily. But rapid pulsating lights suggest critical failure of detected components already disrupting normal operation. Slower blinking reflects degrading parts quite close to total failure.
Q: Do red LEDs on motherboards mean my CPU or RAM totally died?
A: Not necessarily but possibly! Red LEDs are associated with corresponding components marked bad through diagnostic checks. But troubleshooting may reveal simple software incompatibilities or Firmware bugs instead of catastrophic hardware death. Thorough analysis helps determine root causes accurately. However, components eventually do degrade if showing increasing errors via red status beacons over time.
Q: My motherboard has a red LED lit near the 8-pin power connector. What should I check first?
A: Red LEDs specifically around power regulation points like 8-pin EPS cable connectors indicate voltage delivery issues from either PSU faults, VRM failures, or loose modular cables. Triple check all power supply cables securely snap into motherboard sockets. Inspect VRMs for dust buildup blocking heatsinks or signs of burnt components. And consider replacing aging PSUs no longer able to maintain steady power levels demanded by components.
Q: If reseating the RAM and cables doesn’t fix the red LED, what next step is best?
A: If connections check out fine yet red LEDs persist, methodically substitute components like RAM modules, CPUs, GPUs or storage drives with verified working spares. This isolation testing determines whether issues originate from particular defective parts or motherboard faults misreporting good devices as bad through diagnostic LEDs. Swap in minimum hardware first to enable narrowing culprits by process of elimination.
Sorry, the comment form is closed at this time.